Thursday, 28 March 2019

Installing an August Lock with a euro cylinder lock

August doesn't officially support euro cylinders, although browsing the web there is a number of people that have had success with them. Sometimes you can just get lucky and the lock you have fits into one of the existing August attachments and is the right length, it seems for more people this isn't the case. Some users have reported luck with a Dana lock euro cylinder, but I couldn't find any of these in my local market or online.

There is no magic solution, if it doesn't fit, you might have to do some work to make it happen, for me this was certainly the case. I wanted to use an August lock to fit in with my existing Home Assistant automation setup and add some ease to getting in the door with a crying infant.

I wanted it to work at my house without any visible modifications other than the August itself, no extra locks on the door or anything like that. To do this significant fabrication was required to make it work, but in the end it all came together.

First I bought a new euro lock to modify, all euro cylinders available on the Australian market were way too long to fit into the August, so I bought a fairly cheap lock and shorted down the barrel, as can be seen below.


I then had to raise the August off the door a little as I couldn't cut back the lock any further without breaking it, for this I 3D printed a mount and mounted that to the door first. Again I didn't want to modify the door unless I had to, so I used 2 existing holes in the door, hence why the holes in my printed mount look misaligned.


Then finally I mounted the August directly to my 3D printed mount.
 
 
The only draw back I can note with the euro cylinder and August is that, at least in my case, when using the key to unlock the door the August has to be reseated to remove the key. This is fine for us as we will use the key for emergencies only and reseating the August only takes around 10 seconds. However if you want to depend on key access daily this isn't a great solution but may vary from lock to lock.
 
Yes its totally possible to mount your August lock on a euro cylinder but you are probably going to have to work a little. If you have an expensive euro lock already fitted, it might be best to buy a cheap lock to modify and play around with as I did.

Friday, 24 October 2014

Server 2012 R2 member server or domain controller can't enroll computer certificate

This article is titled Server 2012 domain controller can't enroll computer certificate, however this also applies to Server 2008 R2 and 2012.

This issue came about by receiving a call early Monday morning reporting that some devices couldn't connect to our wireless network. We immediately suspected an NPS issue, as users reported devices on other SSID were not affected.

Upon investigating the issue, We found one of our NPS connection request policies complaining there was no valid certificate available to authenticate EAP/PEAP requests. This was strange as all NPS are members of AD and should receive certificates via automatic certificate enrollment. In fact all these NPS initially received a certificate when they joined the domain via automatic enrollment.

Next we opened the Certificates (Local Computer) MMC snap-in and went to local computer personal certificates, the only certificate listed had expired the previous night, problem confirmed.


The Problem

Upon attempting to manually request a new certificate we were greeted with "Certificate types are not available". It was almost as if there was no certificate services in the domain.

We jumped onto another domain joined server and found we could successfully enroll a computer certificate and inspection of other servers showed they all had up to date and valid certificates, only this one server was affected.

The only difference between the problematic server and other servers tested was our faulting server was a domain controller. This led us to the Certificate Templates snap-in on the Certificate Authority (CA) server.


The Resolution
1. Go to your CA and open the Certificate Templates snap-in. 
2. Right click Computer (or whatever Certificate you are trying to enroll and click properties) 
3. Open the Security tab 
4. Add "Domain Controllers" read and enroll permission, apply and close. If your member servers are experiencing this issue, you may need to add "Domain Computers" with read and enroll.


On our CA, "Domain Controllers" was missing permissions on the Computer certificate. As soon as we added Domain controllers with read and enroll permissions, the NPS could immediately enroll a new certificiate.

Originally when our domain controller was a member server, it was part of the Domain Computers group, which had the required read and enroll permissions and therefore received a certificate upon joining the domain. However the member server was then upgraded to a DC and when it attempted to request a new certificate it was denied as it didn't have appropriate permission.

A big problem caused by a simple and easy to fix error.

Tuesday, 22 July 2014

Citrix Xendesktop 7.1/7.5 black screen on login

Nothing is worse than putting in all the effort to build a new Xendesktop environment, PVS farm and master image before finding yourself faced with the dreaded black/blank screen on login.

There are a number of reasons this can occur, including enhanced desktop experience, however there are some factors that occur in the most common cases.
  • Windows 8, Windows 8.1, Server 2012 or Server 2012 R2 is used
  • Xendesktop 7.1 or 7.5 is used
  • 8 dot 3 name creation was disabled at the time of installing the VDI
  • PVS was used in the image creation process
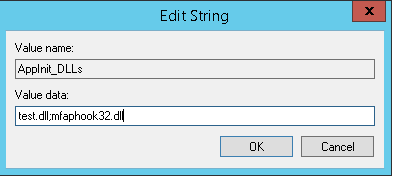
This problem is normally associated with 8 dot 3 name creation being disabled. The "HKEY_LOCAL_MACHINE\Software\Microsoft\Windows NT\CurrentVersion\Windows\AppInit_DLLs" registry key references mfaphook.dll (or mfaphook64.dll if 64bit) via its 8dot3 name. 

In basic terms

No 8dot3 name = mfaphook appinit location pointing to no where = no mfaphook loaded on login = no desktop for the user

Once 8 dot 3 is disabled it can't be re-enabled without significant work, in most cases a re-install of the underlying operating system is going to be quicker and more reliable. This is an annoying fault as many PVS optimization guides list disabling 8 dot 3 name creation as a performance enhancing tweak. 
However there is a reliable work around.

Before proceeding with the work around, you can do the following test to determine if you have 8 dot 3 name creation disabled.

Dot 3 Name creation disabled - the below workaround may assist

C:\>dir program*. /x
Volume in drive C is DDC1
Directory of C:\
06/05/2012 10:41 AM <DIR> Program Files
06/05/2012 04:49 PM <DIR> Program Files (x86)


Dot 3 Name creation enabled - the below workaround may not assist
C:\>dir program*. /x
Volume in drive C is DDC1
Directory of C:\
06/05/2012 10:41 AM <DIR> PROGRA~1 Program Files
06/05/2012 04:49 PM <DIR> PROGRA~2 Program Files (x86)


The workaround


We noted that the "HKEY_LOCAL_MACHINE\Software\Microsoft\Windows NT\CurrentVersion\Windows\AppInit_DLLs" registry key referenced "C:\Program Files\Citrix\System32\mfaphook64.dll" but via its 8dot3 name "C:\Progra~1\Citrix\System32\mfaphook64.dll".


Initially we tried simply adding "C:\Program Files\Citrix\System32\mfaphook64.dll" to the AppInit_DLLs string, this didn't work.

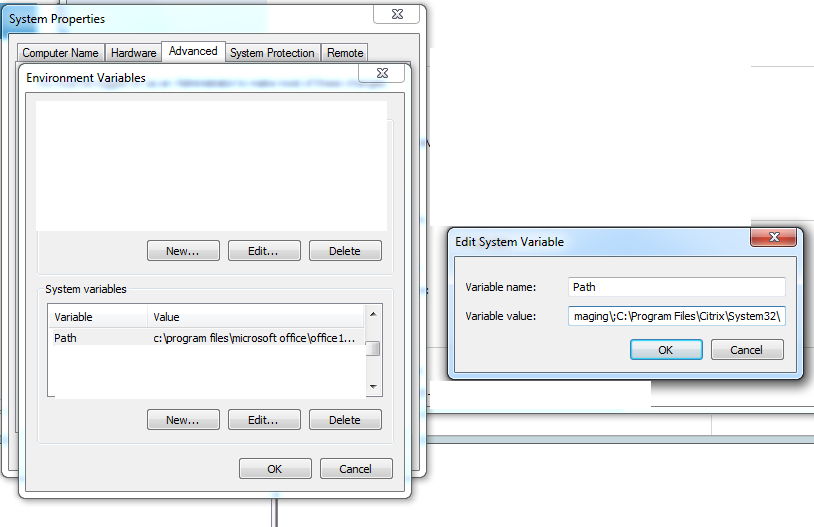
To fix the problem first we added "C:\Program Files\Citrix\System32\" to our systems PATH environmental variable.

1. Open Control Panel, click System

2. Click Advanced system settings
3. Click environmental variables
4. From the Systems variable list, select "Path" and click edit
5. Be sure to leave the existing string, but add the below line to the end of the string. Yes it does need the semicolon.
;C:\Program Files\Citrix\System32\


Next we add the reference to the registry.

1. Open regedit

2. Go to HKEY_LOCAL_MACHINE\Software\Microsoft\Windows NT\CurrentVersion\Windows
3. Open the AppInit_DLLs key
4. If the key is empty, simply add "mfaphook64.dll" for 64 bit systems or "mfaphook.dll" for 32 bit. Don't include the quotations.

If there is already data in the AppInit_DLLs key, add a ; before the dll. For example ";mfaphook64.dll", again without the quotations.


As we added the directory in the environmental PATH variable we don't need to specify a path in the registry key. When the system looks for mfaphook it will search all the directories in %PATH%.


That should be it, you don't even need to reboot. Your users should now be able to login without a black screen. If they still can't, then I suggest you try to re-install to VDA and disable enhanced desktop experience as mfaphook loading likely isn't your issue.

Thursday, 10 July 2014

Windows installer can't find HP DL 380 server hard disk

This is a very frustrating but common problem when building a new server. You un-box and boot up the sparkling new machine, connect your virtual media to a windows ISO and begin the installation. However when you get to the disk selection dialogue Windows can't find the disk.

You spend the next 30 minutes searching the HP website for SATA pre-installation drivers and none of them work, until you find the most simple solution to the problem.


The Solution

Luckily for us, HP has been including these drivers on-board for some time now.

1. Fire up the server and jump into BIOS. 
2. Select Advanced Options. 
3. Select Advanced System ROM Options.


4. Select Virtual Install Disk.
5. Select Enable.
 
6. Save and exit BIOS.

Next time you fire up that Windows installation, windows will magically see that new Raid 10 array you just created.


Tuesday, 17 June 2014

Update to Yubiradius modification - Use only OTP and allow temporary tokens

In 2012 we released a modification patch to Yubiradius 3.5.1 that supports using just the OTP for authentication. The default Yubiradius install requires the AD password + OTP to be combined as a single string.

In a deployments where you want 2 password fields, 1 for AD and another for Yubiradius, a modification is needed to the Yubiradius ropverify.php

After our initial release we made some further modifications that allowed temporary tokens. Our initial release could only be used for the full OTP, if a temporary 8 character token was issued, this would not work.


The Patches

If you are already running our modified version of Yubiradius 3.5.1 ropverify.php then you can apply THIS patch to just add temporary token support.

If you are running a standard 3.5.1 and want to add OTP only auth with temporary token support please apply THIS patch.

Please follow the step by step instructions on our original blog post if you need support in applying the patch to /var/www/wsapi/ropverify.php

Also available HERE is a modification by "Dan" that works with Yubiradius 3.5.4, however this DOESN'T have temporary token support. You could apply this, then my temp token patch and it would work fine.

We have since ceased using Yubiradius in our environment so we can't verify if versions later than 3.5.4 are supported.

Monday, 19 May 2014

Adobe Premiere Elements takes a long time to load in a firewalled environment

After going through the pain that is packaging Adobe Premiere Elements for a domain environment, we found ourselves faced with another issue.

On any machines that don't have direct access to the internet, the Premiere Elements initial load took a very long time.

However Adobe does provide some logging to diagnose start-up problems, which can be found under \Users\[username]\AppData\Local\Temp\amt3.log (Windows 7 and above).


The Solution

An analysis of the logs identified a request for "Activating License" and shortly after a "HTTP Request Status code 502" which indicates a bad gateway.

The line after the license activation begins gives us some clues to the solution. "License server is https://activate.adobe.com/servlets/inet_sl/sl_v1_7_rclient (protocol=slcore)"


The easiest way to get rid of the Premiere Elements delay is to simply allow activate.adobe.com:443 to pass directly to the internet. Premiere is smart enough to use the OS proxy, so you may need to add a proxy exclusion to Internet Explorer.

If you have no way of allowing traffic directly out, then some form of proxy server may be your only option.


Thursday, 24 April 2014

DPM 2012 R2 failing to backup SQL 2012 SP1 Always On Cluster VM

After we created a new Server 2012 R2 cluster and migrated our VMs across, the next job was to get backup in place with DPM 2012 R2.

Most of the machines backed up with Online backup without issue and our SQL cluster was no exception, the online backup initiated without fault. However after some time one of the Always On cluster came back with the following error.

The VSS application writer or the VSS provider is in a bad state. Either it was already in a bad state or it entered a bad state during the current operation. (ID 30111 Details: VssError:The writer experienced a non-transient error.  If the backup process is retried,
the error is likely to reoccur.
 (0x800423F4))

Digging further on the SQL machine with the "vssadmin list writers" command, we found that the SQL VSS Writer service was in an error state.


The Solution

The solution is very simple but introduces some other problems.

1. Jump on the erroneous SQL server.
2. Open a command prompt and type services.msc
3. Go the SQL VSS Writer service and stop the service.
4. Re-run the DPM job.

This successfully completes the VM snapshot backup, but it introduces an issue with SQL backup if you are also using DPM for SQL backup on the same Always On cluster.

In a SQL Always On cluster, the DPM backups are by normally taken from the secondary node. The primary node is left alone to do SQL, while the inactive secondary takes the heavy backup load.

This is why we only had the problem on our secondary node, it is also why it introduces an SQL backup problem. When the SQL VSS Writer service is stopped, DPM can't perform SQL backups on the server.

Two possible options are:

1. Don't perform VM snapshot on your backup node, it may be overkill anyway. In the event of a failure you can spin up a new VM and make it the new secondary.

2. Run a schedule that disables the SQL VSS Writer service some time before the VM snapshot and re-enable it again after the snapshot.

We are using option 2 and so far it is working well. You need to ensure that your SQL backup isn't occurring during your SQL VSS writer disabled period, but your a good admin and wouldn't have your VM snapshot and SQL backup scheduled at the same time anyway!

Monday, 7 April 2014

Lync 2013 response group alternatives - bypassing the annoying beep

Lync 2013 is a great product, especially for education with Microsoft agreements in place. It can offer a low cost PABX replacement that integrates seamlessly with other Microsoft products.

Arguably the biggest downfall of Lync throughout multiple releases has been the response groups and how they handle incoming calls. Features such as business hours and the queues work well, but the annoying response group connection beep is enough to push any sane receptionist over the edge.

The other big downfall of response groups is survivability. When deploying a resiliency group, a manual fail-over of the CMS is required for response groups to work. Normally response groups are used on critical extensions, such as reception, lines that you can ill afford to have down for any length of time.

For anyone that is unfamiliar, when a user picks up a call that is routed through a response group, after picking up the handset an audible beep is played until the transfer from the response group to the user picking up the call is complete. Depending on the endpoint (phone, Lync client, etc) this beep can take longer and sound different, but one thing is consistent, it drives receptionist crazy.

There are a number of proposed workarounds to response groups, including using call delegation, but all of them remove the automated "out of hours" component of the response group. The ability for the phone to automatically transfer to voice-mail between specific hours and ring during work hours.


The Solution


Part 1, Calling queues

We like the idea of simultaneous ring to delegates. One of the biggest benefits of response groups is having an alternate call group ring after a pre-determined amount of time. In response groups this is an alternate queue with a delay. This allows a receptionist on a call, or not available, to be covered by other staff, without bombarding these staff with every call.

To do this we create a standard Lync login with domain account, and use this as the "control" account.

We sign the reception in with the control account and then set-up a simultaneous ring to delegates with a delay. This is a simple and elegant solution for simple call groups. However if you have a complex call group with multiple queues and delays this won't work.

This is nothing new, lots of bloggers have suggested this as a genuine alternative to a response group, but it is lacking the out of hours functionality that a response group has.


Part 2, Managing out of hours

This is where the white board came into play and we came up with a plausible idea.

Windows task scheduler, simple right? Task scheduler can run a batch file or command at any predefined time or on the triggering of an event.

We are keeping it simple and triggering the following events.

Monday-Friday 8AM: Simultaneously ring delegates with delay
Monday-Friday 4PM: Forward calls directly to voice-mail

This ensures that calls are forwarded as required during business hours and outside of business hours the call is forwarded straight to voice-mail.

To run these tasks you will need to configure sefautil as a Lync trusted application, this is outside the scope of this blog but is available on many other blogs.

In testing we found the order in which sefautil tasks are executed is critical to success, below is an example of the tasks we are running. Note that before you run these commands you need to set-up your list of delegates.


8AM script, disable voice-mail fwd and enable call delegates fwd with 15 second delay
sefautil.exe /server:SERVERNAMEHERE receptionphone@contoso.info /disablefwdimmediate
sefautil.exe /server:SERVERNAMEHERE receptionphone@contoso.info /enablesimulring
sefautil.exe /server:SERVERNAMEHERE receptionphone@contoso.info /simulringdelegates /delayringdelegates:15


4PM script, disable call forward, enable voice-mail fwd
sefautil.exe /server:SERVERNAMEHERE receptionphone@contoso.info /disabledelegation
sefautil.exe /server:SERVERNAMEHERE receptionphone@contoso.info /enablefwdimmediate
sefautil.exe /server:SERVERNAMEHERE receptionphone@contoso.info 
/setfwddestination:receptionphone@contoso.info;opaque=app:voicemail

It was critical to run the disable tasks before running the enable tasks. When we did manual testing this didn't matter, but for the script to run successfully any existing forwarding needed to be disabled before enabling more.

These tasks have been running successfully for 6 weeks now without any issues.

Thursday, 6 March 2014

Internet Explorer 11 appears blank on Windows 8.1 and Server 2012 R2

We have intermittently had clients complaining that their Internet Explorer was blank. When they open the desktop version of Internet Explorer 11 we experience they blank internet browser, if they type a URL and press enter IE does open the site. Menu options such as settings and about are greyed out.

We have had success deleting a users profile, this resolved the issue, however it is not the best experience for the end user.

After taking some time to troubleshoot the issue we were able to pinpoint the registry key "HKCU\Software\Microsoft\Internet Explorer" as the problematic area.


The Resolution

We don't have a permanent fix, it looks like this problem transcends both Server 2012 R2 and Windows 8.1, so a future Microsoft fix may resolve the issue.

However you can fix this on a case by case basis with the following.

1. Log on as the problematic user

2. Open regedit

3. Navigate to HKCU\Software\Microsoft

4. Delete the "Internet Explorer" key

You could also script it with reg delete or add it as a Citrix UPM registy exclusion in a VDI environment if you don't have the requirement to save Internet Explorer settings changes.

Monday, 24 February 2014

DPM 2012 R2 only allows offline backups of VM with updated integration tools

All DPM admins that backup Hyper-V VMs have seen the dreaded offline backup state before. Admins of earlier versions of DPM might know this as "Saved State", either way its annoying and disruptive to backup VMs in an offline/saved state.

Recently when we did a migration of VMs from one Hyper-V cluster to another with SCVMM, we came across an issue where most of the VMs appeared as "Offline backup" in the DPM console.

This can be caused by a multitude of issues, including not having a SCSI adapter connected to the VM and running an old version of the integration tools.

However after checking all the requirements (listed below), we were still only able to capture offline backups on some VMs.
  • The Backup (Volume Snapshot) Integration Service is disabled or not installed.
  • A virtual machine has one or more dynamic disks.
  • A virtual machine has one or more volumes that are based on non-NTFS file systems.
  • In a cluster configuration, the virtual machine Cluster Resource Group is offline.
  • A virtual machine is not in a running state.
  • A Shadow Storage assignment of a volume inside the virtual machine is explicitly set to a different volume other than itself.

In testing we removed a VHD from a VM that had multiple VHD connected and then tested it, this worked! Funnily enough, when we re-added the VHD, the VM still could be backed up online. This led us to a fix that worked on most of our problematic VMs.


The Resolution

1. Open up Hyper-V or SCVMM.
2. Go into the hard drive settings of the problematic VM and remove all VHD (not delete, just remove for now - do I even need to say that?).
3. Save the VM.
4. Re-add the VHD and save the VM again.
5. Start the VM
6. Attempt to backup with DPM again, you may need to clear the state cache in DPM

Essentially we are doing nothing, removing and re-adding a configuration. However this seems to resolve the issue on most VM. This may or may not be similar in your environment, as these VM had all been migrated between Hyper-V servers with VMM.

Wednesday, 5 February 2014

Lync 2013 CMS error: Instance points to a CMS store that is being moved to a different pool

We were doing some routine checks of a newly provisioned Lync 2013 front end fail-over pool when we discovered a CMS error on the backup pool in the event logs. Our deployment is configured with two standard edition front end pools with resiliency.

The error is as follows:

Event ID 4082
LS Backup Service

Microsoft Lync Server 2013, Backup Service central management backup module failed to complete import operation.
Configurations:
Backup Module Identity:CentralMgmt.CMSMaster
Working Directory path:\\lync002.contoso.info\lyncstore\1-BackupService-20\BackupStore\Temp
Local File Store Unc path:\\
lync002.contoso.info\lyncstore\1-BackupService-20\BackupStore
Remote File Store Unc path:\\
lync002.contoso.info\lyncstore\1-BackupService-21\BackupStore
 Additional Message:
 Exception: Microsoft.Rtc.BackupService.ModuleUnavailableException: Backup module is temporarily unavailable at this point. Reason: Instance (local)\rtc points to a CMS store that is being moved to a different pool.
   at Microsoft.Rtc.BackupService.BackupModules.CentralMgmtBackupModule.CheckModuleAvailability(Nullable`1 primaryPool)
   at Microsoft.Rtc.BackupService.BackupModules.CentralMgmtBackupModule.GetBackupCookie()
   at Microsoft.Rtc.BackupService.BackupModuleHandler.ReceiveBackupDataTask.GetBackupCookie(Boolean& isModuleInitialized)
   at Microsoft.Rtc.BackupService.BackupModuleHandler.ReceiveBackupDataTask.InternalExecute()
   at Microsoft.Rtc.Common.TaskManager`1.ExecuteTask(Object state)
Cause: Either network or permission issues. Please look through the exception details for more information.
Resolution:
Resolution


This error message was repeated every 15 minutes as the backup jobs were run. A separate error was created for the import and export process.

During our testing phase we did some fail-over testing which included moving the CMS database to the fail-over node. We believe this may have caused this error to occur. While it was not causing any known issues in the environment, it may come to a head should we ever need to fail over to our resiliency node.


The Resolution

The resolution was fairly simple but did require a few attempts before we got the process order correct.


1. Open the Lync Topology Builder and remove the associated backup pool from the resiliency tab of the primary front end pool.

2. Publish the topology

3. Use the Get-CsManagementStoreReplicationStatus powershell applet to verify the topology has replicated to the associated backup pool.

4. Open a command prompt to "%ProgramFiles%\Microsoft Lync Server 2013\Deployment" and run the bootstrapper.exe on the backup pool. This will remove the management and backup service from the backup pool.

5. Remove the CMS database from the backup pool using the following powershell command.
Uninstall-CsDatabase -CentralManagementDatabase -SqlServerFqdn lync002.contoso.info


6. Go back to the Topology Builder and re-add the associated backup pool to the primary front end pool.

7. Publish the topology

8. Wait for the topology to replicate

9. Re-run the bootstrapper on the backup pool node


This 5 minute process fixed the error messages for us and hopefully saves us in the unfortunate even of a fail-over.

Friday, 3 January 2014

SCOM 2012 OleDB Module 0x80004005 errors after SQL database move


After migrating our SCOM 2012 R2 DB and Data Warehouse DB to a new SQL server we were receiving SCOM alerts that there was a problem with the OleDB module.


The Problem

The initial alert indicated that there was a login problem. This prompted us to check, re-check and triple-check all the SQL logins and permissions between the old and new SQL servers.

Alert description: OleDb Module encountered a failure 0x80004005 during execution and will post it as output data item. Unspecified error: Cannot open database "OperationsManager2012" requested by the login. The login failed.
Workflow name: Microsoft.SystemCenter.SqlBrokerAvailabilityMonitorForPool

After not having much luck we eventually decommissioned the old SQL server. Once the old SQL server was turned off, the alert changed from a login failed to a "SQL server does not exist". This error got us thinking, maybe its not a permission problem but some parts of SCOM may have been still pointing at the old SQL server.
Alert description: OleDb Module encountered a failure 0x80004005 during execution and will post it as output data item. Unspecified error: [DBNETLIB][ConnectionOpen (Connect()).]SQL Server does not exist or access denied.
Workflow name: Microsoft.SystemCenter.SqlBrokerAvailabilityMonitorForPool


The Solution 

A search of the registry found a few keys that were undocumented in the SQL migration document I was reading. These keys are:

HKLM\SOFTWARE\Microsoft\Microsoft Operations Manager\3.0\Setup\DatabaseServerName

HKLM\SOFTWARE\Microsoft\Microsoft Operations Manager\3.0\Setup\DataWarehouseDBServerName
HKLM\Software\Microsoft\System Center\SetupBackup\Blue\Database\DatabaseServerName

After changing these keys and restarting the SCOM server all was well!


Tuesday, 12 November 2013

Citrix, Windows 7 Thin PC, Thin kiosk and Wireless limitations

We have decided to go with a Xenapp model with predominately wireless devices. The challenge is how to get Windows 7 Embedded, write filtered, non-domain joined devices to connect to a wireless network and work smoothly. Our solution was to provision an open wireless network and present only a pair of DNS servers and a Citrix VPX cluster into the wireless network. This is effectively an internet style DMZ network that allows our internal wireless and BYOD machines to all connect in the same manner.

Thinkiosk is a great free product from Andrew Morgan that provides a locked down environment for launching VDI. As part of our adoption of Xenapp we wanted to modify our existing Windows 7 Thin PC image to support Thinkiosk in wired and wireless configurations.

Thinkiosk works great in wired deployments, but there are some limitations with wireless. If you are using Thinkiosk in an auto login, non-domain joined scenario, Thinkiosk launches very quickly, often before the wireless connection has initialized.


Making Thinkiosk work smoothly with wireless

To get around the existing limitations we have created a vbscript that waits for the Thinkiosk URL to become available before launching Thinkiosk. After 24 seconds if a connection isn't established, the wireless control panel applet is launched. After 60 seconds if a connection to the URL still can't be established then Thinkiosk is launched regardless.

You can modify these thresholds and URLs very easily in the below.

The script is available from my pastebin here

To launch the script on logon, simply replace your windows shell with cscript and the script path as per below
reg add "HKEY_local_machine\Software\Microsoft\Windows NT\CurrentVersion\Winlogon" /v shell /t reg_sz /d "cscript c:\windows\thinkiosklauncher.vbs" /f


Supporting wireless persistence with write filters

The other major limitation with Wireless and Windows 7 Embedded is the ability to retain wireless configurations when write filters are enabled. Write filters do a great job of keeping a consistent device and lower support, but they can also be restricted if local changes are required.

We want users to take the devices home and connect in the same manner as they would if they on site. We have configured split-brain DNS so the Citrix URL is accessible both internally and externally. For this to work smoothly our users need to be able to connect to their home wireless networks and the settings need to be remembered. Could you imaging typing in your uber secure 64 character WPA key every time you turn the device on? Yuck, no thanks.

We have determined the following exclusions need to be added to support wireless persistence on write filter enabled machines.
File: c:\programdata\microsoft\wlansvc\profiles
Registry: HKLM\software\microsoft\windows nt\currentversion\networklist\profiles
Registry: HKLM\software\microsoft\wlansvc\interfaces
Adding the above exclusions in conjunction with Thinkiosk wireless support gives your users the ability to connect and remember wireless networks on their thin client. Depending on the write filter method you are using you will may a different command, but for file based write filters you can add the file exclusion as per below.

fbwfmgr /addexclusion c: "\programdata\microsoft\wlansvc\profiles"

The registry settings are a little more involved, we suggest reading the following blog to get some more insight on how that's achieved http://geekswithblogs.net/WallabyFan/archive/2008/12/24/everything-you-wanted-to-know-about-fbwf-but-were-afraid.aspx

Thinkiosk wireless client support can be enabled with the following registry key.

reg add "HKEY_local_machine\Software\THINKIOSK" /v ShowWifi /t reg_dword /d "1" /f

We have also added a line to the above Thinkiosk wireless launcher script to re-import our internal wireless network after each boot. This is just to ensure our users don't accidentally (or intentionally) delete our wireless network.

objShell.exec("Netsh wlan add profile filename=c:\windows\wireless-open.xml user=all")

The above wireless-open.xml configuration can be exported with the netsh wlan export tool and then re-imported on each boot or login to ensure your network is never permanently removed.

Thursday, 31 October 2013

Publishing Server 2012 R2 Work Folders with UAG 2010 SP3 Reverse Proxy

We already knew before 2012 R2 came out that we were going to use Work Folders in a trial later in the year. As soon as the ISO dropped we began organizing our server environment to handle Work Folders synchronization. Of course the biggest part of this is allowing synchronization from home, so reverse proxying a remote access solution was a must.

We use UAG 2010 and while Microsoft may have a wizard in the upcoming SP4, unfortunately is not available yet for early adopters. Here are the steps we used to make it work.


Prerequisites

Before you start it is best to use split-brain DNS for a smooth and speed workfolders experience. Create a new DNS record on your internal DNS servers using the external DNS FQDN with a low time-to-live, maybe 15 minutes, point this to your internal workfolders server IP. Then create the same DNS record on DNS servers authoritive for your external records and point this to your UAG trunk.

The records will resolve something like:
Internal: workfolders.consoto.info 192.168.1.1 (Internal Work Folders server)
External: workfolders.consoto.info 180.0.0.1 (External UAG Trunk)


Step by Step
1. Open UAG and take an existing trunk (or create a new trunk) that has Trunk authentication disabled. The trunk we used had a wildcard certificate and it worked perfectly. 
2. Add a new application. 
3. Select "Other Web Application (application specific hostname)", click OK. 
4. Name the application "workspaces" and application type "workspaces", click OK. 
5. Select "Configure an application server", click OK. 
6. In "addresses" enter your workspaces URL, we are using split-brain DNS so the internal and external address will be the same. 
For paths enter "/sync/1.0/" as this is the only part of the Work Spaces server that the reverse proxy needs to forward. 
In public hostname enter workspaces, you will need to create the corresponding external A record (or CNAME record for existing trunks), click OK. 

7. Leave "use SSO" unticked, click OK. 
8. Un-tick "add a portal and toolbar link", click OK. 
9. Leave "Authorize all users" ticked, click OK. 
10. Click finish to create the application. 
11. Now we must make some modifications to the URL set, to do this click "Configure trunk settings" under the trunk. 
12. Click the URL set tab and find the "workfolders_Rule1" rule. The rule already will show the URL of "/sync/1.0/.*", we need to modify the methods. 
The default methods are POST and GET, add in DELETE, PUT and HEAD. 
Click OK to save the settings. 
13. Click the "workfolders" application and select edit. 
14. Select the Web Settings tab and click "Allow POST requests without a content-type header", then click OK to accept the changes. 
15. Save your changes and activate your configuration

Monday, 21 October 2013

Aastra 6725ip POE problems with HP Procurve switching

We recently received a number of Aastra 6725ip handsets, the handsets immediately powered up via POE and connected to our Lync 2013 deployment. After I returned to work on Monday morning none of the phones were still connected to the Lync server, after rebooting them they no longer booted from POE.

This problem was introduced when they updated to newer OC Phone firmware editions 4.0.7577.4397 (CU9) and above. Although we can't confirm if the issue was introduced in firmware versions CU8 and below.

We tried a number of different Procurve switch models including other 5400 series switches (all fully populated with 900w POE+ power supplies) and 2900 series models, all experienced the same no power problems. The switches complained of not detecting an MPS signature and occasionally the switch also gave over current detection errors. If we used a POE injector or DC power supply the phone started without an issue. We also verified this was not an issue with POE power limits, pre-std-detection or LLDP.

After contacting Aastra they asked us to take a photo of the label underneath the phone. After the technician viewed the label they immediately offered to RMA all my phones but didn't give any reasons as to why they needed to be RMA'd.

After receiving the new phone I compared the labels and to no surprises the replacement unit is a Revision B compared to the previous Revision A unit.

While this is not in any way confirmed by Aastra, we theorize that in later editions of Lync 2013 phone edition some changes were made to the POE signature that caused incompatibilities with the Revision A Aastra 6725ip handsets and HP Procurve swit ches. If you are experiencing similar issues Aastra and very efficient at dealing with issues and promptly shipped me new handsets without any hassle.

The old handset


The new handset

Tuesday, 8 October 2013

Lync 2013 client popup credentials are required for Outlook

When we started migrating users to Exchange 2013 and Lync 2013, users began complaining of being prompted to enter their credentials for Outlook when starting Lync.

The exact error message is:
Credentials are required
Lync needs your username and password to connect for retrieving calendar data from Outlook


We did some Wiresharking and found this to occur when Lync was connecting to the EWS and Autodiscover Exchange URLs.


The Solution

1. Ensure your internal and external EWS/Autodiscover URLs are in the Internet Explorer local intranet zone. This will be extremely helpful in assisting you to troubleshoot the problem.

2. Logon to your Exchange server and open IIS.

3. Click the EWS directory under "Default Web Site".

4. Open Authentication, click Windows Authentication and then Providers.

5. Remove all entries except for NTLM.


6. Repeat the same for the Autodiscover directory.

7. Restart IIS.

Now restart your client and you should no longer be prompted for Outlook credentials.


Additional troubleshooting tips

Internet Explorer debug tools are great for troubleshooting authentication issues, but first ensure your EWS/Autodiscover URLs are in the Internet Explorer local intranet zone.

A simple test is to go to the EWS URL (http://yourdomain/EWS/exchange.asmx) in Internet Explorer, it should automatically negotiate authentication and show you the service page. If you don't receive the "You have created a service" page then your single sign on is not correctly configured.

1. Open Internet Explorer and press F12 to launch the debug tools.

2. Click Network and "Start Capturing".

3. Now open your EWS URL: http://yourdomain/EWS/exchange.asmx

4. Click "Stop Capturing" and click "Go to detailed view"

You can see the order of the authentication providers and any issues that might have occured during authentication. You can then repeat the same for Autodiscover, remember if Autodiscover can't negotiate pass through authentication then it will prompt the Lync user for credentials.


Wednesday, 2 October 2013

Integrating Office Web Apps 2013 with Exchange 2013 OWA and UAG gateway

Office web apps 2013 (OWA) is a great way to extend the functionality of Exchange 2013 Outlook Web App and give full Powerpoint viewing functionality in browser. When we built our new Exchange 2013 environment we wanted to offer Office Web apps internally and externally.

After building our environment we had no problems making OWA work internally with Outlook Web App, but externally we always received error messages from OWA.

"Sorry, we couldn't open this presentation because we ran into a problem. Please try again."


Our external Outlook Web App is accessed via a Forefront UAG trunk, however there were no error messages on the OWA, Exchange or UAG servers indicating a problem.

We ran Wireshark packet trace on the OWA server and found that when the request for the Powerpoint web app was established externally, the OWA server tried to establish a connection to UAG. This makes sense as the Powerpoint file needs to be transferred from Outlook Web App to OWA somehow and UAG stands in its way.


The Resolution

1. Create a simple A record in the hosts file of the OWA server.The A record should be the FQDN of your UAG trunk to the internal IP address of your Outlook Web App server, a load balancer address is fine here.

In our circumstance we needed to re-issue the Exchange certificates to include the UAG FQDN in the subject alternate name of the certificate. We tried without re-issuing the certificate but received the same "Please try again." error messages as above. As you would expect the OWA server is rejecting the certificate as it doesn't contain the correct FQDN.

You also need to ensure your OWA server has network connectivity to the HTTPS port of your Outlook Web App server.

While this is a simple fix, it did take us a while to even consider trying this. Now we have lots of happy users able to preview power point and word documents externally.

Tuesday, 1 October 2013

Outlook & Lync 2013 prompting for authentication with Exchange 2013 Outlook Anywhere

We are currently undergoing a massive migration from Exchange, Lync and Sharepoint 2010 to 2013. The first service being migrated is Exchange, making way for Lync and later Sharepoint. During our Exchange migration it hasn't all been smooth sailing, before we even got started we had to wipe our DAG and start again. However with a little persistence we got a trial DAG up and running and migrated a couple test mailboxes.

As we got into the trial we found some users with Outlook 2013 had single sign on (NTLM) while others were prompted for authentication. This also effected Lync as the UCMAPI service connects to Exchange via Outlook, so Lync was also prompting for credentials when the user logged in. While a password prompt is acceptable for external use, we were not happy with this for internal devices.

Clients that were prompted for authentication were able to single sign on to rpcproxy and EWS with Internet Explorer, so the problem didn't seem server based.

Hours were invested trying to resolve this problem, so of the fixes we attempted were:

  • Packet tracing
  • IIS log tracing
  • Re-creating RPC and EWS directories
  • Changing authentication in the Outlook client
  • Changing authentication on exchange virtual directories
  • Changing IIS authentication
  • Adding exchange domains to local intranet zone in Internet Explorer
  • Bypassing load balancers
  • Client based registry hacks
  • Client application re-installation


The Resolution

We were nearly at the point of building a second Exchange environment for testing when we made a breakthrough, I almost feel embarrassed admitting the problem, group policy.

Our legacy Exchange 2010 group policy was set up for RPC internally and https Outlook Anywhere externally, however we never set the MSSTD field, in fact we implicitly removed it with GPO.

As soon as we set the MSSTD field to one of the SAN names of the certificate (wildcards certificates are also fine), the Outlook client single sign on worked perfected and Lync stopped asking for authentication on sign in.

Hopefully you don't waste as much time as we did on this problem.

Friday, 6 September 2013

Exchange 2013 mail stuck in draft - Mailbox Transport Submission service failing to start

We just recently begun building an Exchange 2013 DAG to support out email environment. This is part of an internal shift to Lync 2013 and Exchange 2013 for unified communications. We followed Microsoft instructions on building my first 2013 machine, migrated a single test mailbox and started testing.

We found no mail flow between the Exchange 2013 and Exchange 2010 environments, all email sent from 2013 OWA or Outlook was just sitting in the drafts folder. In fact even if I emailed within mailboxes on the 2013 mail database they would also stay in drafts.

Upon investigating this problem there was a failure of the "Microsoft Exchange Mailbox Transport Submission", "Microsoft Exchange Transport" and "Microsoft Exchange Frontend Transport" services.


The Problem

Windows application event logs showed the following errors when trying to restart the "Microsoft Exchange Mailbox Transport Submission" service.
Log Name: Application
Source: Application Error
Event ID: 1000 
Faulting application name: MSExchangeSubmission.exe, version: 15.0.712.12, time stamp: 0x51aff4c9
Faulting module name: unknown, version: 0.0.0.0, time stamp: 0x00000000
Exception code: 0xc00000fd
Fault offset: 0x000007fb0b3cc301
Faulting process id: 0x2894
Faulting application start time: 0x01ceaa8fd8cefada
Faulting application path: C:\Program Files\Microsoft\Exchange Server\V15\Bin\MSExchangeSubmission.exe
Faulting module path: unknown
Report Id: 179beb57-1683-11e3-93f5-00155dd80a77
Faulting package full name:
Faulting package-relative application ID: 

There is also another event log with some more telling information.
Log Name: Application
Source: MSExchangeTransportSubmission
Event ID: 7010 
The activation of modules are taking longer than expected to complete. Current state of components:<LoadTimings>
....
  <Component Name="Dns" Elapsed="00:00:23.1781923" IsRunning="true" />
</LoadTimings>
<StartTimings />
<StopTimings />
<UnloadTimings />
It is indicating that the DNS component was failing to start in a timely manner.


The Resolution

We checked and double checked our DNS, no issues. We also followed a number of blogs that indicate you need disable IPv6 and manually select the network adapter under DNS lookups on the Exchange server properties. We did this to no avail, however the actual resolution wasn't far off.
1. Open Exchange 2013 ECP
2. Go to "Servers" tab
3. Select "servers" from across the top menu
4. Double click the problematic server from the list of Exchange servers
5. Select "DNS lookups"
6. Instead of selecting your network adapter, select "Custom settings" under "External DNS lookups"
7. Add all your DNS servers
8. Repeat the same for "Internal DNS lookups"
9. Restart the above failing transport services
10. Rejoice


This seems to be a bug with a .NET 4 module Microsoft.Exchange.Net.ni.dll. Selecting "Custom settings" bypasses this .NET bug.

If you are still having issues with mail flow, ensure your new Exchange 2013 server has a system mailbox and consider removing the Exchange 2013 server, wiping AD clean and starting a fresh install.

Monday, 19 August 2013

eVc I2C PWM controller

I recently received an exciting package in the mail, Jon Elmor Sandstrom sent me his latest creation, eVc. eVc is a USB connected I2C controller, capable of interfacing directly with PWM controllers that support I2C. In short this device gives the ability to change a number of PWM settings on the fly. This can help to push insane overclockers and troubleshoot problems with motherboards and graphics cards.

I have taken a closer look at eVc with a Gigabyte 7790 OC card, first with ambient air cooling and then with -40 degree Celsius on my single stage cooler.

The video below goes into detailing explaining how eVc works with a little demonstration of the clocks gained by a combination of extra voltage, load line and subzero cooling.

I am really looking forward to seeing how the future of this device pans out.