Showing posts with label asterisk. Show all posts

Monday, 28 November 2011

Integrating Lync 2010 and Asterisk

Lync 2010 is a great product and can stand on its own to deliver a good PABX system for the education or business sectors. Where Lync falls down is flexibility, tying in 3rd party scripts, connectivity with products like Skype and even voice based menus. Fortunately we can easily route calls between Asterisk and Lync to produce a much more flexible outcome.

I am a massive fan of Asterisk and have used it numerous times in the past for both my home PABX and several businesses I previously supported. Asterisk is not the easiest product for the end user to connect to, a strength that Lync defiantly has.

In my environment I am using an Asterisk box with advanced scripting based dial plans to handle the incoming PSTN to SIP traffic.


The Integration Process

Obviously you need a working Lync and Asterisk installation before you can begin the process. I'm not going into the Asterisk/Lync server setup process in this tutorial but AsteriskNOW is a great place to start if you want an easy to install Asterisk product. I recommend installing the command line variant and not using the limiting AsteriskGUI, it's harder to learn but also gives you many more possibilities.

1. First we need to configure the SIP trunk in Asterisk's sip.conf. Open /etc/asterisk/sip.conf in your favourite Linux editor and add the following text to the end of the file.

[lynctrunk]
type=friend
port=5068
host=192.168.1.10
dtmfmode=rfc2833
context=fromlync
qualify=yes
transport=tcp,udp

The host= variable needs to reflect your Lync front end, for example my front end IP address is 192.168.1.10. Then save and close the file.

2. Next we are going to add an entry to our /etc/asterisk/extensions.conf file to give us an extension we can call from Lync as a test. Open /etc/asterisk/extensions.conf and add the following text to the end of the file.

[fromlync]
;echo test
exten=>9999,1,Answer()
exten=>9999,2,Playback(en/demo-echotest)
exten=>9999,n,Echo
exten=>9999,n,Playback(en/demo-echodone)
exten=>9999,n(eof),Hangup()

Save and close the file. This 9999 extensions will allow us to do a simple echo test, the [fromlync] header is important as this is the context that our sip.conf entry refers to in step 1.

3. Issue the reload command from the Linux command line, this will force Asterisk to load the above changes.
asterisk -rx "reload"

4. Now we can move onto the Lync side, jump on your Lync server and fire up the the topology builder. "Download the latest toplogy from existing deployment" and then jump straight to the "PSTN Gateway" section.

5. As far as Lync is concerned, Asterisk is a PSTN gateway, so right click PSTN Gateways and click "New IP/PSTN Gateway..."

6. On the "Define New IP/PSTN Gateway" screen we need to specify the settings for our Asterisk box. You will need to enter the IP Address, set 5060 as the port and select TCP as the SIP transport protocol as per the image below.

7. To publish the topology changes we have just made, right click on the Lync Server 2010 menu option and select "Publish Toplogy...". After a few seconds these topology changes should be complete, but it can take some time for them to propagate to the Lync server.

8. Now our SIP trunk is in place, Lync needs a dial-plan and associated routes so it knows what numbers it should route to our new Asterisk trunk. We will start by adding a dial plan entry, open the Lync Control Panel and click on the "Voice Routing" option, then select "Dial Plan"

9. Click on the "Global" entry, then select "edit" and "show details".

10. Under the "Associated Normalization Rules" select "New" to add a new rule.

11. You can call the rule anything you want, for the other settings:
"Starting digits" field put "9"
"Length:" field select "Exactly" and "4"
"Digits to remove:" field select "0"
"Digits to add:" field remove the "+" to leave the field blank
You can copy my settings as per the example photo below, then click "OK"

12. You now need to commit the changes. Click "Commit" and then select "Commit all", on the following page click "Commit" again.

13. Now we need to define a "Voice Policy" to forward any 9XXX dialled numbers in Lync to Asterisk. To do this select "Voice Routing" from the left hand side menu and then select "Voice Policy".

14. Again we need to select the "Global" rule, click "edit" and "show details".

15. Under the "Associated PSTN Usages" select "New" to add a new rule.

16. Give your rule a name and then click "New" to add a new route.

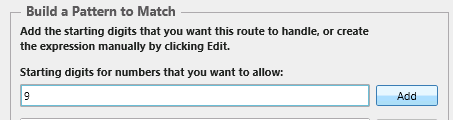
17. On the "New Route" screen, give your route a name and then and the in the "Build a Pattern to Match" section add 9 into the box and select "add". This is an extremely board match, but you can tighten it up later it you want.
18. Then move down to the "Associated gateways" box and add the PSTN gateway we earlier added to our topology builder. Click "OK" in the top left hand corner to accept the route. Then "OK" again on the "New PSTN Usage Record" screen to accept. Finally click "OK" on the Edit Voice Policy screen to accept your new route entry.

19. Again we must commit the changes by selecting "Commit" and clicking "Commit all", then click "Commit" on the following screen.

20. The last piece of the configuration puzzle is to go to the "Voice Routing" options tab from the left hand menu, select "Route" from the top menu. and commit these changes. To commit the changes select "Commit" and click "Commit all", then click "Commit" on the following screen.


Now for the fun part

The dreaded configuration is out of the way, now lets test it out. If things don't work immediately please wait 15 minutes and try again, Lync can take some time to propagate changes.

Before we attempt the call it is a good idea to open an asterisk console by SSH'ing into the Asterisk box and typing asterisk -cr on the command line. This will allow you to want the traffic coming in from Lync to Asterisk and how the dial plans are accessed in real time.

1. Open your Lync client and dial 9999

2. If you opened the Asterisk console you will see the call passed from Lync to Asterisk and the dial plan take effect. You should hear the echo test begin though your Lync connected head set or phone.

I have blanked out some of the sensitive information but here is an example of what you should see on the Asterisk console (click to enlarge).

Congratulations! You now have a Asterisk/Lync monster that you can manipulate however you want. Of course if you want calls to go in the other direction you can use a dial plan entry such as Dial(SIP/1000@lynctrunk,35,tr) in your Asterisk extensions.conf to call SIP extension 1000 on your Lync box.


Some troubleshooting tips
  • First troubleshooting step is to wait 15-30 minutes. It may take some time for the topology changes to propogate.
  • Sign out and then back into Lync.
  • Do a hard restart of Asterisk with the /etc/init.d/asterisk restart command. This will force a reload of the configuration.
  • Re-read step 7 and ensure you did publish the topology changes, then wait 15 minutes.
  • If you have any firewall enabled on your Lync or Asterisk box take it down until you get things working. If you require a firewall after all is working, then you need to enable the following port exclusions.
Port 5060 TCP/UDP should be open on your Asterisk box.
Ports 10000-20000 should be open for RTP traffic on the Asterisk box.
Port 5068 TCP/UDP should be open on your Lync box.  

Thursday, 24 November 2011

Compiling app_swift for AsteriskNOW or Fedora

For those building Asterisk interactive voice menus the app_swift plugin is a must. Giving the administrator the ability to directly interface with Cepstral voices from within the dial plans is a massive time saver. 


The problem 

Unfortunately many users are having issues with compiling the app_swift module on AsteriskNOW as the appropriate build tools are not included in the operating system.

If you don't have the correct tools installed you will probably see an output like this.

/usr/include/string.h:66: error: declaration for parameter âmemchrâ but no such parameter
/usr/include/string.h:62: error: declaration for parameter âmemcmpâ but no such parameter
/usr/include/string.h:59: error: declaration for parameter âmemsetâ but no such parameter
/usr/include/string.h:51: error: declaration for parameter âmemccpyâ but no such parameter
/usr/include/string.h:43: error: declaration for parameter âmemmoveâ but no such parameter
/usr/include/string.h:38: error: declaration for parameter âmemcpyâ but no such parameter
/usr/lib/gcc/i486-linux-gnu/4.3.2/include/stddef.h:214: error: declaration for parameter âsize_tâ

app_swift.c:569: error: expected â{â at end of input
make: *** [app_swift.o] Error 1


The result is no app_swift.o module and a frustrated administrator. 


Installing app_swift

The following instructions will work with Asterisk 1.6.x on AsteriskNOW or Fedora distributions.

1. Before you install app_swift you need to download and build the Cepstral swift package. Start by downloading the Allison voice package, alternatively you can choose a voice you prefer from Cepstral.com.
wget http://downloads.cepstral.com/cepstral/i386-linux/Cepstral_Allison-8kHz_i386-linux_5.1.0.tar.gz

2. Extract the package .
tar -zxvf Cepstral*

3. Enter the directory.
cd Cepstral_Allison-8kHz_i386-linux_5.1.0

4. Run the installer.
./install.sh

5. Load the library into ld.
echo /opt/swift/lib > /etc/ld.so.conf.d/cepstral.conf

6. Now run ldconfig to finish the ld configuration process.
ldconfig

7. Its time to get app_swift compiled, first start by downloading the source.
wget http://pbxinaflash.net/source/app_swift/app_swift-1.6.2.tar.gz

8. Before we can compile swift, the appropriate build tools and libraries must be installed into the OS. Issue the following commands sequentially to install the tools with yum.
yum install gcc

yum install build-essential
yum install asterisk-devel

yum install kernel-devel
yum groupinstall "Development Tools"

9. Extract app_swift in preparation of compiling.
tar -zxvf app_swift-1.6*

10. Go into the app_swift directory.
cd app_swift-1.6.2

11. Now we can make the package.
make ; make install

12. Copy the configuration file to the asterisk directory.
cp swift.conf.sample /etc/asterisk/swift.conf


13. We also need to make a symbolic link to the swift binary for easier access.
ln -s /opt/swift/bin/swift /usr/bin/swift

14. Finally you need to edit swift.conf to reflect the voice you have installed. I always choose Allison, but the choice is yours.
sed -i 's|David-8kHz|Allison-8kHz|' /etc/asterisk/swift.conf

15. We finish with restarting Asterisk
/etc/init.d/asterisk restart  


Confirming all is well

Once the installation is complete the module should be loaded into Asterisk. You can check this by starting asterisk console and issuing the show application command.

1. asterisk -cr
2. core show application swift
If everything is running smoothly you should see an output similar to below.

asterisk*CLI> core show application swift
  -= Info about application 'Swift' =-

You can now start swift()'ing your way to a flexible, intuitive and interactive dial plan that suites your requirements.

Saturday, 19 November 2011

Home automation possibilities using X10 and Asterisk

A couple of years ago I was seriously sick, I knew I was going to be in hospital and then couch bound for several months and decided a home automation project was going to help me get through the tougher times.

After looking at all the automation options, I decided on using the X10 standard. It's affordable, extremely flexible and most importantly I don't need to make any physical modifications to my rental house to implement it. X10 using existing power lines to communicate by using adapters that sit between the power socket and the device to remotely turn devices on and off. Also available among a huge list of optional adapters are light socket adapters that similarly interface between the light socket and the light, providing remote control lighting.

I purchased and quickly implemented a number of X10 power and lighting adapters and a remote to control them. They worked great, but I wanted more. I wanted to control more devices and I wanted to do it remotely, these are all things that X10 does not offer.


X10 is cool, but I need more

Enter Asterisk, the open source, Unix based, PABX solution. I had worked with Asterisk before for several businesses I supported, but only with simple dial plans and voice mail. While Asterisk is designed as a PABX, it has all the required framework to be a great automation conduit. The key features I want to leverage are  the support for complex menus, ability to trigger Unix scripts and most importantly the ability accept remote commands via a VOIP dial-in number.

My plan was to setup Asterisk to handle all the triggering of the automation, then if I was at home I could use my portable VOIP phone or off-site I could dial in with my mobile.


The first steps to home automation

The first step is to setup your Linux based PC with the X10 computer interface module, install and setup Asterisk and register your VOIP phone number with the Asterisk box. I have been using VOIP at home for a number of years, so it was easy for me to connect my handset to Asterisk and then let Asterisk connect to my VOIP provider.

What I love most about Linux is the way things so easily connect together with scripting tools such as grep and awk. I set about making a number of scripts that when requested from the Asterisk dial plan, would go about performing my tasks. I was able to automate the following tasks via Asterisk.
  • Getting a temperature reading from inside my house remotely by using a USB based temperature probe
  • Turning on/off lightning and my coffee machine
  • Inputting scheduled recordings into my Media Center by the use of a small C++ MCE tool I coded (available here)
  • Starting and controlling my air conditioner via the use of a USB infrared transmitter
  • Activating a web cam in my house and triggering an iptables port forward of the webcam. I could then view the RTSP feed via my mobile phone.
  • Accepting all commands via voice input using the Sphinx speech recognition framework
  • Voice based SSH port knocking
  • Getting the Asterisk box to tell me my IP address for remote access
  • Controlling the current state of my house via external scripting. For example, after 10:30PM, my house would set it self to a sleep state, redirect all incoming VOIP calls to voice mail.
  • The ability to schedule wake up calls
  • All incoming numbers would be announced over a speaker before the phone rings


What you need to build a similar setup

The beauty of Asterisk is that via the "asterisk -rx" command, you can issue commands directly to Asterisk via the Linux command line. For example you could have a X10 movement sensor setup with the heyu daemon listening to trigger a specific script when any movement is detected. That script could then initiate a dial-plan that calls you and reports there has been movement detected. You could then, via Asterisk and your VOIP number, remotely dial in and trigger your webcam stream to be started which you could view on your mobile phone.

To tie everything together I wrote two sets of scripts that worked in separate ways.

One set of scripts are triggered by Asterisk events. Any time I call Asterisk and speak or dial a command, these scripts are triggered to perform tasks such as turning on a light or reading back the current temperature via text to voice.

The second set of scripts are triggered by events such as time of day, a motion sensor being triggered or an iptables logging event. This second set of scripts then initiate Asterisk commands via "asterisk -rx" or performed other tasks such as turning light on or off.

I took things a step further by creating an Asterisk variable called "house mode". I included lists of settings for modes such as phone, night, day, sleep and do no disturb. Based on the current house mode, speaker volume can be automatically adjusted, asterisk can choose whether to ring the phone or send the call directly to voice mail and lights can be dimmed or toggled.

You can potentially store any variables you want in Asterisk via the database put function, but for reliability it is best to store them somewhere more "permanent". For example I keep the current house mode in a flat file and use that file to populate the database as per the example below.

asterisk -rx "database put x10 housemode `cat /etc/heyu/state/housemode.curr`"


Some code examples

This is by no means a small project, it requires extensive bash scripting to link everything together. I have included some code examples below that will hopefully give you some ideas and help get you started.
This system worked amazingly well for me and was both challenging and fun to build. While I was in hospital I could keep watch of my empty house and when I returned home I hugely benefited from the automation while I was confined to my bed.

Hopefully you can use some of these ideas to get started but please don't hesitate to contact me for more information.