Showing posts with label citrix. Show all posts

Tuesday, 22 July 2014

Citrix Xendesktop 7.1/7.5 black screen on login

Nothing is worse than putting in all the effort to build a new Xendesktop environment, PVS farm and master image before finding yourself faced with the dreaded black/blank screen on login.

There are a number of reasons this can occur, including enhanced desktop experience, however there are some factors that occur in the most common cases.
  • Windows 8, Windows 8.1, Server 2012 or Server 2012 R2 is used
  • Xendesktop 7.1 or 7.5 is used
  • 8 dot 3 name creation was disabled at the time of installing the VDI
  • PVS was used in the image creation process
This problem is normally associated with 8 dot 3 name creation being disabled. The "HKEY_LOCAL_MACHINE\Software\Microsoft\Windows NT\CurrentVersion\Windows\AppInit_DLLs" registry key references mfaphook.dll (or mfaphook64.dll if 64bit) via its 8dot3 name. 

In basic terms

No 8dot3 name = mfaphook appinit location pointing to no where = no mfaphook loaded on login = no desktop for the user

Once 8 dot 3 is disabled it can't be re-enabled without significant work, in most cases a re-install of the underlying operating system is going to be quicker and more reliable. This is an annoying fault as many PVS optimization guides list disabling 8 dot 3 name creation as a performance enhancing tweak. 
However there is a reliable work around.

Before proceeding with the work around, you can do the following test to determine if you have 8 dot 3 name creation disabled.

Dot 3 Name creation disabled - the below workaround may assist

C:\>dir program*. /x
Volume in drive C is DDC1
Directory of C:\
06/05/2012 10:41 AM <DIR> Program Files
06/05/2012 04:49 PM <DIR> Program Files (x86)


Dot 3 Name creation enabled - the below workaround may not assist
C:\>dir program*. /x
Volume in drive C is DDC1
Directory of C:\
06/05/2012 10:41 AM <DIR> PROGRA~1 Program Files
06/05/2012 04:49 PM <DIR> PROGRA~2 Program Files (x86)


The workaround


We noted that the "HKEY_LOCAL_MACHINE\Software\Microsoft\Windows NT\CurrentVersion\Windows\AppInit_DLLs" registry key referenced "C:\Program Files\Citrix\System32\mfaphook64.dll" but via its 8dot3 name "C:\Progra~1\Citrix\System32\mfaphook64.dll".


Initially we tried simply adding "C:\Program Files\Citrix\System32\mfaphook64.dll" to the AppInit_DLLs string, this didn't work.

To fix the problem first we added "C:\Program Files\Citrix\System32\" to our systems PATH environmental variable.

1. Open Control Panel, click System

2. Click Advanced system settings
3. Click environmental variables
4. From the Systems variable list, select "Path" and click edit
5. Be sure to leave the existing string, but add the below line to the end of the string. Yes it does need the semicolon.
;C:\Program Files\Citrix\System32\
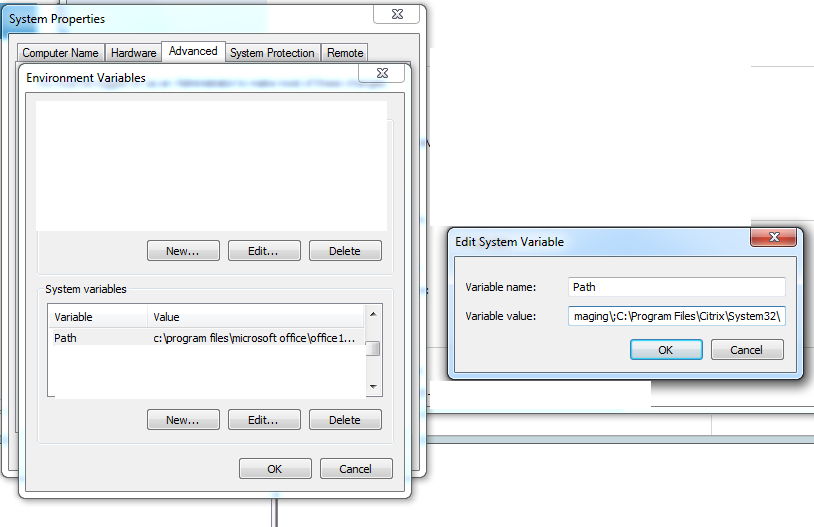


Next we add the reference to the registry.

1. Open regedit

2. Go to HKEY_LOCAL_MACHINE\Software\Microsoft\Windows NT\CurrentVersion\Windows
3. Open the AppInit_DLLs key
4. If the key is empty, simply add "mfaphook64.dll" for 64 bit systems or "mfaphook.dll" for 32 bit. Don't include the quotations.

If there is already data in the AppInit_DLLs key, add a ; before the dll. For example ";mfaphook64.dll", again without the quotations.
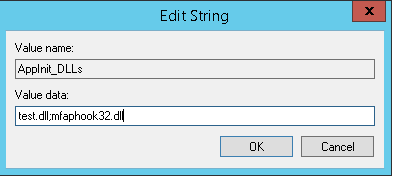


As we added the directory in the environmental PATH variable we don't need to specify a path in the registry key. When the system looks for mfaphook it will search all the directories in %PATH%.


That should be it, you don't even need to reboot. Your users should now be able to login without a black screen. If they still can't, then I suggest you try to re-install to VDA and disable enhanced desktop experience as mfaphook loading likely isn't your issue.

Thursday, 6 March 2014

Internet Explorer 11 appears blank on Windows 8.1 and Server 2012 R2

We have intermittently had clients complaining that their Internet Explorer was blank. When they open the desktop version of Internet Explorer 11 we experience they blank internet browser, if they type a URL and press enter IE does open the site. Menu options such as settings and about are greyed out.

We have had success deleting a users profile, this resolved the issue, however it is not the best experience for the end user.

After taking some time to troubleshoot the issue we were able to pinpoint the registry key "HKCU\Software\Microsoft\Internet Explorer" as the problematic area.


The Resolution

We don't have a permanent fix, it looks like this problem transcends both Server 2012 R2 and Windows 8.1, so a future Microsoft fix may resolve the issue.

However you can fix this on a case by case basis with the following.

1. Log on as the problematic user

2. Open regedit

3. Navigate to HKCU\Software\Microsoft

4. Delete the "Internet Explorer" key

You could also script it with reg delete or add it as a Citrix UPM registy exclusion in a VDI environment if you don't have the requirement to save Internet Explorer settings changes.

Tuesday, 12 November 2013

Citrix, Windows 7 Thin PC, Thin kiosk and Wireless limitations

We have decided to go with a Xenapp model with predominately wireless devices. The challenge is how to get Windows 7 Embedded, write filtered, non-domain joined devices to connect to a wireless network and work smoothly. Our solution was to provision an open wireless network and present only a pair of DNS servers and a Citrix VPX cluster into the wireless network. This is effectively an internet style DMZ network that allows our internal wireless and BYOD machines to all connect in the same manner.

Thinkiosk is a great free product from Andrew Morgan that provides a locked down environment for launching VDI. As part of our adoption of Xenapp we wanted to modify our existing Windows 7 Thin PC image to support Thinkiosk in wired and wireless configurations.

Thinkiosk works great in wired deployments, but there are some limitations with wireless. If you are using Thinkiosk in an auto login, non-domain joined scenario, Thinkiosk launches very quickly, often before the wireless connection has initialized.


Making Thinkiosk work smoothly with wireless

To get around the existing limitations we have created a vbscript that waits for the Thinkiosk URL to become available before launching Thinkiosk. After 24 seconds if a connection isn't established, the wireless control panel applet is launched. After 60 seconds if a connection to the URL still can't be established then Thinkiosk is launched regardless.

You can modify these thresholds and URLs very easily in the below.

The script is available from my pastebin here

To launch the script on logon, simply replace your windows shell with cscript and the script path as per below
reg add "HKEY_local_machine\Software\Microsoft\Windows NT\CurrentVersion\Winlogon" /v shell /t reg_sz /d "cscript c:\windows\thinkiosklauncher.vbs" /f


Supporting wireless persistence with write filters

The other major limitation with Wireless and Windows 7 Embedded is the ability to retain wireless configurations when write filters are enabled. Write filters do a great job of keeping a consistent device and lower support, but they can also be restricted if local changes are required.

We want users to take the devices home and connect in the same manner as they would if they on site. We have configured split-brain DNS so the Citrix URL is accessible both internally and externally. For this to work smoothly our users need to be able to connect to their home wireless networks and the settings need to be remembered. Could you imaging typing in your uber secure 64 character WPA key every time you turn the device on? Yuck, no thanks.

We have determined the following exclusions need to be added to support wireless persistence on write filter enabled machines.
File: c:\programdata\microsoft\wlansvc\profiles
Registry: HKLM\software\microsoft\windows nt\currentversion\networklist\profiles
Registry: HKLM\software\microsoft\wlansvc\interfaces
Adding the above exclusions in conjunction with Thinkiosk wireless support gives your users the ability to connect and remember wireless networks on their thin client. Depending on the write filter method you are using you will may a different command, but for file based write filters you can add the file exclusion as per below.

fbwfmgr /addexclusion c: "\programdata\microsoft\wlansvc\profiles"

The registry settings are a little more involved, we suggest reading the following blog to get some more insight on how that's achieved http://geekswithblogs.net/WallabyFan/archive/2008/12/24/everything-you-wanted-to-know-about-fbwf-but-were-afraid.aspx

Thinkiosk wireless client support can be enabled with the following registry key.

reg add "HKEY_local_machine\Software\THINKIOSK" /v ShowWifi /t reg_dword /d "1" /f

We have also added a line to the above Thinkiosk wireless launcher script to re-import our internal wireless network after each boot. This is just to ensure our users don't accidentally (or intentionally) delete our wireless network.

objShell.exec("Netsh wlan add profile filename=c:\windows\wireless-open.xml user=all")

The above wireless-open.xml configuration can be exported with the netsh wlan export tool and then re-imported on each boot or login to ensure your network is never permanently removed.

Tuesday, 12 February 2013

Decreasing Windows 7 and Xendesktop logon time

A windows domain environment provides many benefits such as group policy, the ability to deploy software and customize users settings. With the benefits also comes increased logon times and lag associated with automation, GPO and drive/printer mappings.

In a contemporary situation when a user logs onto a machine for the first time their profile is created and during future logons their is no requirement to re-apply settings/group policy unless the policy has changed. Citrix have addressed the situation of profiles within Xendesktop environments with their Citrix Profile Manager (CPM). CPM can be perfect for some situations, but not all. What if you want your users settings sanitized after every logon? What if you need a clean slate or don't want to manage/delete problematic profiles as they arise?

If you go without CPM then logons are invariably slower due to the re-creation of %userprofile% and collation of policies into HKCU on every logon. This is where creating a custom default profile can be handy. If you pre-create the profile and then remove some of the windows customization stubs, you can cut valuable seconds off your logon time.

For example, my default Xendesktop logon time was around 1 minute for users without CPM. Once I added a custom default profile it dropped to around 45 seconds and removing some of windows default customization stubs dropped the time even further to 40 seconds. If a 20 second reduction doesn't sound like much, just ask your end users that have to endure an eternity of windows welcome screens taunting them with the a never ending spinning circle.


Creating a custom default user profile

Microsoft suggest using their copyprofile unattended.xml method which does work well and is the only Microsoft supported method of overriding the default user profile in Windows 7. Unfortunately for those users that already have a working and highly customized Citrix vdisk, the thought of sysprepping might not be  most welcome idea.

The other method is to do an old fashion override of the default user profile. However there is some caveats with this, it's unsupported by Microsoft and there can be issues such as the My Documents folder being named the same as the account from which you overrode the default user profile with. I have found no such issues with my Xendesktop profiles and I used the override method. If you do chose to use this method, please test robustly.

An extremely handy tool for the override method is Windows Enabler, it un-greys out (for lack of a better term) the "Copy to...." profile box under the Windows User Profiles control panel applet.


I would however suggest if you are using planning to use a customized default profile with a flat Windows 7 (non-virtualized) deployment you do use the copyprofile method, perhaps as part of your SCCM/MDT deployment process.


Removing customization stubs to increase logon time

Even more frustrating than waiting at the welcome screen is getting past it then realizing your going to have to wait another 15-30 seconds for Windows to "personalize your settings", this is where customization stubs come in.

Under the registry path "HKEY_LOCAL_MACHINE\SOFTWARE\Microsoft\Active Setup\Installed Components\" there are a number of listed IDs in the format of "{2C7339CF-2B09-4501-B3F3-F3508C9228ED}". Within some of these ID's is a REG_EXPAND_SZ value named "StubPath".

When a user logs on, regardless of if the default user profile contains the required settings, any stubpath commands in this registry path are executed, costing you valuable milliseconds during logon. We can speed up the logon simply by removing the required stubs.

You can remove the stubs you want by searching for "stubpath" within the "HKEY_LOCAL_MACHINE\SOFTWARE\Microsoft\Active Setup\Installed Components\" key, the "(Default)" value will tell you what the stub in question is responsible for.


Below is an example of some of the stubs I remove by simply applying the below .reg file to my vDisk.


Windows Registry Editor Version 5.00
;IE9
[HKEY_LOCAL_MACHINE\SOFTWARE\Microsoft\Active Setup\Installed Components\>{26923b43-4d38-484f-9b9e-de460746276c}]
"StubPath"=-
;Browser
[HKEY_LOCAL_MACHINE\SOFTWARE\Microsoft\Active Setup\Installed Components\>{60B49E34-C7CC-11D0-8953-00A0C90347FF}]
"StubPath"=-
;Themes
[HKEY_LOCAL_MACHINE\SOFTWARE\Microsoft\Active Setup\Installed Components\{2C7339CF-2B09-4501-B3F3-F3508C9228ED}]
"StubPath"=-
;MailNews
[HKEY_LOCAL_MACHINE\SOFTWARE\Microsoft\Active Setup\Installed Components\{44BBA840-CC51-11CF-AAFA-00AA00B6015C}]
"StubPath"=-
;WMP 12.0
[HKEY_LOCAL_MACHINE\SOFTWARE\Microsoft\Active Setup\Installed Components\{6BF52A52-394A-11d3-B153-00C04F79FAA6}]
"StubPath"=-
You should test, test and then test again when removing any of these stubpaths as they can cause unintended consequences. In fact unless you are using a customized default user profile it is probably safest to leave stubpaths alone. 

For example if you remove the Windows Theme stub, without populating the default user profile, this will result in a classic theme (Windows XP style). It is the windows theme stub that handles apply's Windows Basic and if possible Aero themes during logon.


Lets hope these couple of simple changes can improve your users experience.

Thursday, 10 January 2013

Citrix Xenserver 6.1 Xentools installation problems

I really do love the Citrix Xendesktop platform and products associated with it, but all too often Citrix have launch issues with their products. The latest issue is with Xentools 6.1 installer being a little dodgy and feature lacking (no PVS/VSS support) being a key problem.
I also experienced a number of issues upgrading from Xentools standard 6.0 to 6.1 on machines that didn't require PVS support.
One of the main issues that I had is what Citrix call "continous reboots with standard tools installation never finishing". Citrix provide the following explaination for the problem:
"This issue occurs when attempting to install the Standard Tools shipped with XenServer 6.1 into a VM that has no virtual network interfaces. A workaround is to create at least one virtual network interface, install the Standard Tools, and then remove the virtual network interface (if so desired)."
In my case there was in fact a virtual network interface and I was still having the looping. Eventually after around 10 reboots the installer simply hangs at the very start of the "installing drivers, installing guest tools screen" and goes no further.
Windows eventlogs give no clues and Citrix logs don't any useful information. After following the "Uninstalling the Xenserver 6.1 standard tools" steps from the CTX135099 Xenserver Tools Workaround Guide for 6.1.0, including removing all the Windows Driver packages manually, I still had no joy. In fact on some systems I couldn't remove the "Windows Driver Package - Citrix Systems Inc. (xennet) Net" package.
After scouring windows programs and featuring and removing everything guest/driver related I feel back to the trusted "wmic product get name" command to get a list of installed products. I found "Citrix Xen Windows x64 PV Drivers" which wasn't listed under Windows programs and features GUI. It seems the "Citrix Xen Windows x64 PV Drivers" package failed to uninstall or install properly and was holding up the xentools installation process. To resolve the problem is fairly simple.
  1. Boot into Windows and open a command prompt
  2. Issue the command - wmic product where name='Citrix Xen Windows x64 PV Drivers' call uninstall
  3. Reboot
  4. Rerun the xentools installation process
After following the above steps I finally had a working Xentools standard successfully installed with statistically reporting being sent back to Xencenter.

Remember if you want to install the legacy tools (with support for PVS and volume shadow copy) then your VM must have its platform:device_id set to 0001. You can read more about changing the device_id under the section title "Preparing to Install the XenServer 6.0.2 Hotfix 9 Tools or XenServer 6.1 Legacy Tools in a New Windows Vista, Windows 7, Windows Server 2008, or Windows Server 2008 R2 VM (for PVS or VSS Support)" of CTX135099.

Friday, 17 August 2012

Techniques to avoid Citrix Xendesktop boot storms

In any environments running Citrix Xendesktop with a PVS configuration, sooner or later you are likely to come across a boot storm, a mini one at least.

A boot storm is essentially a denial of service. It occurs when multiple Xendesktop or Xenapp servers reboot simultaneously and use all the available resources (normally CPU) causing extreme slowness in the rest of the environment. In some cases this initial boot storm can flow through for the rest of the day as your virtual infrastructure never recovers from the initial resource demand.

As you could imagine in a educational environment this can be amplified as X number of users log off at the end of each lesson then expect to log in 5 minutes later when their next lesson starts.

An easy fix would be to simply disable any "reboot on logoff" functionality but that can have its own implications.

For example your PVS environment may use a write cache redirect to local storage, this gives improved performance as it is less reliant on network infrastructure but is usually smaller in size. If your system was not rebooting on every logoff there is increased potential for the write cache to become full and with Xendesktop 6 the write cache overflow is on the PVS HDD itself.


Battling the infamous boot storm without changing write cache settings
After analysing our environment we decided we wanted to disable "reboot on logoff" but defiantly wanted to keep our "Cache on device hard drive" write cache configuration.  These two don't really work together by default, but these few changes allowed us to make them work perfectly together.

Part 1 - Daily reboot

Firstly we configured a daily reboot, we found the easiest way to do this was through a combination of script and Citrix policy.

Through our Desktop Group properties we have configured our Power management schedule to slowly start turning machines off around 12AM, coming to a low of 0 between 3 and 4AM. Then machines started  turning on again, allowing us to peak back our at 100 machines at 7AM, ready for staff and students to login at 8AM. By slowly turning these machines on/off we ensure we don't trigger a boot storm.

To compliment our Desktop Group Power management configuration we also set a simple task schedule on the virtual desktops themselves at 3:45AM to trigger a reboot. At 3:45AM there should be no more than around 5 machines still running, ensuring we are only rebooting a few machines at this time. This might not suit all environments, but in ours there is never going to be anyone using Citrix at 3:45AM.

That ensures at least 1 reboot a day clears the write cache.


Part 2- Write cache evaluation on logoff

Part 2 is slightly more complex but just as important in ensuring the write cache has space available.

Using the kixstart scripting language and a logoff script, we run an evaluation on available write cache space. Depending on the outcome of that evaluation we trigger a reboot or simply just allow the system to log off.

This will ensure any systems that have below a specified threshold of available write cache will reboot and the rest will be immediately ready to serve the next user. I have attached the evaluation script below, written in the kixtart language.

writecachemonitor.kix

This script can be triggered by a simple windows domain logoff user script targeted to the virtual desktop OU with loopback.


These two simple techniques have worked wonders for us, not a single boot storm, our performance has noticeably increased and end-users are much happier.

Wednesday, 11 January 2012

Citrix Xenserver 6.0 fails update pre-check when applying updates

A while back I upgraded my Xenserver 5.6 FP1 servers to Xenserver 6.0, the upgrade was very smooth, well so I thought. Today I had scheduled some time to apply the 4 Xenserver 6.0 hotfixes currently available but hit a few snags along the way.

When I went to upload the new hotfixes, 1 of my Xenserver complained that pre-check 5 of 5 had failed, the exact error message was as below:

SERVERNAME: The update precheck stage failed: prerequisite updates are missing.
I also noticed the server was in a permanent update pending state (as can be seen from the arrow icon below), even though I hadn't initiated an update.

Upon further investigation I found the server was still trying to install old Xenserver 5.6 updates that I never installed before upgrading the server, which was in turn blocking the new updates from installing. This can be caused by not installed updates on the pool master first, but in my case the servers are not in a pool.


Resolving the problem

Fortunately the problem is (or was in my case) quite easy to fix.

1. Open Xencenter, select the server in question and click the console tab.

2. Issue the "xe patch-list" command, this command will give you a list of pending or installed patches.
xe patch-list

3. For every patch with a "name-description" containing 5.6, obtain the UUID (for example in the above image the UUID is "17fde43e-0a5e-48ac-8b85-cf6ed9c6344d"), then issue a "xe patch-destroy" command.
xe patch-destroy uuid=<UUID>

for example:
xe patch-destroy uuid=17fde43e-0a5e-48ac-8b85-cf6ed9c6344d


4. You may or may not need to restart the server but if you have been successful the "down arrow" icon next to the server name will disappear and return to a "green circle" (as per the image below).

This simple fix should resolve your problems, although some users on the Citrix forums have reported similar problems that are more serious. In most cases these users have migrated the data to another server and rebuilt the server.

I still don't know how this problem was caused, but I suspect I simply had pending updates on this particular server before I upgraded it to Xenserver 6.0 that became "stuck".

Thursday, 26 May 2011

Virtual Desktop Write Cache - To SAN or not to SAN?

Education is currently buzzing with virtualization. Where can we use it? How much is it going to saves us? How do we implement it? One of the key issues that keeps coming up is where do we put our write cache? write cache on PVS HD (SAN) or write cache on devices HD, they are both possible options, I won't go into target devices RAM today as I don't think it as viable as the other options.

We are specifically dicussing a configuration of Citrix Xendesktop 5 in conjunction with Citrix PVS 5.6 fp1 as a delivery method for the image.


Slipping it into the SAN (write cache on PVS HD)

At a glance SAN write cache looks like a great option, why not move the write cache onto the PVS and consolidate the write cache in with the rest of our enterprise data? The is a definitate positive, but on the negative we can potentially kill the IOPS of our SAN, the same storage medium our business critical services are using.

Imagine this scenario, our servers are under heavy load, perhaps we have a very SQL transaction load and this is already straining your IOPS. Then you have a class of students log into their virtual desktops and use some write intensive application on the desktop. All of a sudden these students have the ability to negatively impact your server performance, or alternatively your server environment can negatively impact your end user experience.

Another negative on the SAN side is the potential price, if you dont already have a SAN, purchasing one specifically for VDI would be rediculous cost, making your VDI ROI way out of proportion with a standard desktop.

You don't HAVE to run your write cache on a SAN storage if you use the write cache PVS HD option, but this is where things get messy. If you have 100 clients accessing an image from the same PVS then you will need adequate IOPS on your PVS local HDD for 100 clients. This is roughly estimated at 15 IOPS per virtual desktop instance, but I like to go over the top and estimate based on 20 IOPS.

IOPS arn't your only problem with this method, not only do you need to supply enough disk speed, you need to remember that all that traffic will be loading your network. You can potentially have 100 IOPS per user, but that won't mater if you have a saturated network, your virtual desktop experience will be awful.


Directing the writes to the device

This option naming is slightly misleading, the write cache is not sitting on the thin client itself, but sitting on the device providing the virtual desktop, your Xenserver, Hyper-V or alternate hypervisor that is hosting your VDI.

The immediate benefit that you realize with this option is that you are seperating your write cache from your servers, so you don't negatively impact your server environment. Not only that, because the write cache is staying on the same physical system as your virtual desktop host, none of that write traffic is ever hitting the network.

Another not so obvious benefit is that if you are providing 100 virtual desktops over 2 physical servers, you can split the IOPS across the two servers, this could provide a better experience for the end user, but it also could cost you more money. Two servers, more disks required, potentially more maintenance.

There is no reason you wouldn't put the PVS image itself on the SAN, but the write cache on the device HD. This way you can consolidate all your images and the PVS itself onto your SAN for redundancy, but avoid all those nasty write IOPS by redirecting them to the virtual desktop host write cache array.


What is the best option for me?

That is an answer that only you can decide, there are definate negatives and positives of both options. For our organization we decided to put the write cache on the device hd and host the PVS vdisk and the PVS itself on the SAN, this cost us less money and gave us piece of mind that our server loads would never be negatively impacted by normal usage or an unlikely denial of service attack.

There are so many other considerations that are outside the scope of this article. Does your thin client provide some write cache capability? Will that save you money? Will it positively or negatively impact your end user experience?

The best advice is explore every option, and don't take anyones word for it, test out the possible options yourself and design a solution that meets your business requirements.