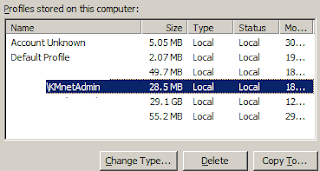
In a contemporary situation when a user logs onto a machine for the first time their profile is created and during future logons their is no requirement to re-apply settings/group policy unless the policy has changed. Citrix have addressed the situation of profiles within Xendesktop environments with their Citrix Profile Manager (CPM). CPM can be perfect for some situations, but not all. What if you want your users settings sanitized after every logon? What if you need a clean slate or don't want to manage/delete problematic profiles as they arise?
If you go without CPM then logons are invariably slower due to the re-creation of %userprofile% and collation of policies into HKCU on every logon. This is where creating a custom default profile can be handy. If you pre-create the profile and then remove some of the windows customization stubs, you can cut valuable seconds off your logon time.
For example, my default Xendesktop logon time was around 1 minute for users without CPM. Once I added a custom default profile it dropped to around 45 seconds and removing some of windows default customization stubs dropped the time even further to 40 seconds. If a 20 second reduction doesn't sound like much, just ask your end users that have to endure an eternity of windows welcome screens taunting them with the a never ending spinning circle.
Creating a custom default user profile
Microsoft suggest using their copyprofile unattended.xml method which does work well and is the only Microsoft supported method of overriding the default user profile in Windows 7. Unfortunately for those users that already have a working and highly customized Citrix vdisk, the thought of sysprepping might not be most welcome idea.
The other method is to do an old fashion override of the default user profile. However there is some caveats with this, it's unsupported by Microsoft and there can be issues such as the My Documents folder being named the same as the account from which you overrode the default user profile with. I have found no such issues with my Xendesktop profiles and I used the override method. If you do chose to use this method, please test robustly.
An extremely handy tool for the override method is Windows Enabler, it un-greys out (for lack of a better term) the "Copy to...." profile box under the Windows User Profiles control panel applet.
I would however suggest if you are using planning to use a customized default profile with a flat Windows 7 (non-virtualized) deployment you do use the copyprofile method, perhaps as part of your SCCM/MDT deployment process.
Removing customization stubs to increase logon time
Even more frustrating than waiting at the welcome screen is getting past it then realizing your going to have to wait another 15-30 seconds for Windows to "personalize your settings", this is where customization stubs come in.
Under the registry path "HKEY_LOCAL_MACHINE\SOFTWARE\Microsoft\Active Setup\Installed Components\" there are a number of listed IDs in the format of "{2C7339CF-2B09-4501-B3F3-F3508C9228ED}". Within some of these ID's is a REG_EXPAND_SZ value named "StubPath".
When a user logs on, regardless of if the default user profile contains the required settings, any stubpath commands in this registry path are executed, costing you valuable milliseconds during logon. We can speed up the logon simply by removing the required stubs.
You can remove the stubs you want by searching for "stubpath" within the "HKEY_LOCAL_MACHINE\SOFTWARE\Microsoft\Active Setup\Installed Components\" key, the "(Default)" value will tell you what the stub in question is responsible for.
Below is an example of some of the stubs I remove by simply applying the below .reg file to my vDisk.
Windows Registry Editor Version 5.00
;IE9
[HKEY_LOCAL_MACHINE\SOFTWARE\Microsoft\Active Setup\Installed Components\>{26923b43-4d38-484f-9b9e-de460746276c}]
"StubPath"=-
;Browser
[HKEY_LOCAL_MACHINE\SOFTWARE\Microsoft\Active Setup\Installed Components\>{60B49E34-C7CC-11D0-8953-00A0C90347FF}]
"StubPath"=-
;Themes
[HKEY_LOCAL_MACHINE\SOFTWARE\Microsoft\Active Setup\Installed Components\{2C7339CF-2B09-4501-B3F3-F3508C9228ED}]
"StubPath"=-
;MailNews
[HKEY_LOCAL_MACHINE\SOFTWARE\Microsoft\Active Setup\Installed Components\{44BBA840-CC51-11CF-AAFA-00AA00B6015C}]
"StubPath"=-
;WMP 12.0
[HKEY_LOCAL_MACHINE\SOFTWARE\Microsoft\Active Setup\Installed Components\{6BF52A52-394A-11d3-B153-00C04F79FAA6}]
"StubPath"=-
You should test, test and then test again when removing any of these stubpaths as they can cause unintended consequences. In fact unless you are using a customized default user profile it is probably safest to leave stubpaths alone.
For example if you remove the Windows Theme stub, without populating the default user profile, this will result in a classic theme (Windows XP style). It is the windows theme stub that handles apply's Windows Basic and if possible Aero themes during logon.
Lets hope these couple of simple changes can improve your users experience.


